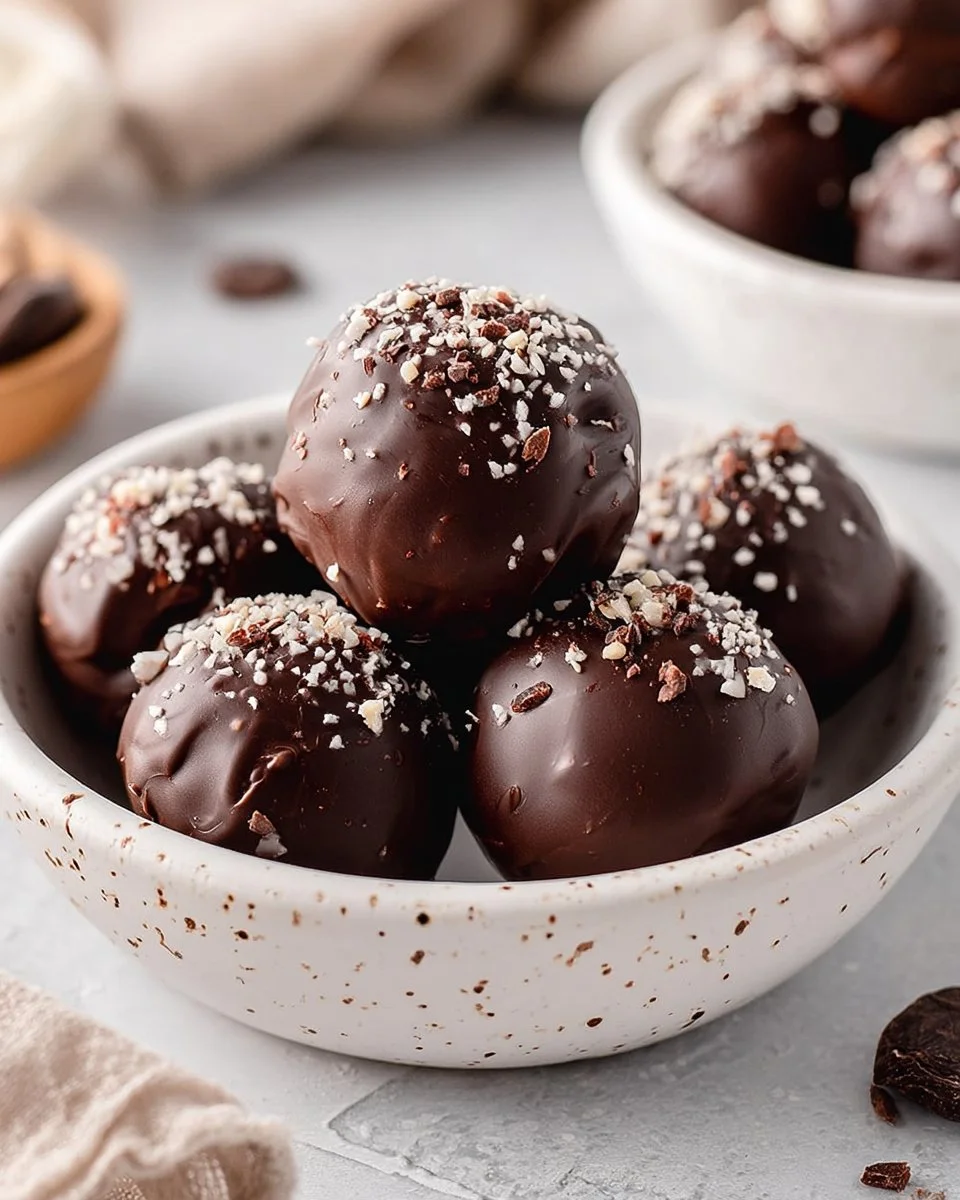
Greek Yogurt Protein Balls
If you’re on the lookout for a protein-packed snack that satisfies your sweet tooth, look no further! Indulging in a treat that is both nutritious and delicious can be challenging, but these little bites are here to save the day. With a rich and creamy base from Greek yogurt, combined with the sweetness of maple syrup and a hint of vanilla, each ball brings delightful flavors to every bite. Plus, the added texture from almond and oat flour creates a satisfying chewiness, while dark chocolate chips deliver a little indulgence. Not only are these bites bursting with flavor, but they’re also easy to whip up and perfect for meal prep. Ready to make a snack that your whole family will love? Let’s get started!
Quick Answer
For a fast, high-protein snack that’s both healthy and delicious, try these Greek Yogurt Protein Balls! Perfect for a quick energy boost.
Why You’ll Love This Recipe
This Greek yogurt protein ball recipe is a must-try for snack enthusiasts!
- High in protein: Each ball contains nutritious whey protein, helping keep you full longer.
- Satisfying sweetness: Maple syrup adds a natural sweetness that satisfies cravings without added sugars.
- Easy preparation: With just a few simple steps, you can have a batch ready in no time.
- Perfect for meal prep: Store them in the freezer for quick grab-and-go snacks any time.
- Nutritious ingredients: Packed with wholesome flours and healthy fats from coconut oil.
- Family-friendly: These bites are loved by both kids and adults alike!
- Versatile: Customize with your favorite mix-ins or make them as sweet as you prefer!
What Makes This Recipe Special
The beauty of these protein balls lies in their well-balanced ingredients. Starting with Greek yogurt, they boast a creamy base that’s tangy and rich, providing great moisture and protein. Almond and oat flours work together to create a pleasant texture that remains chewy but not dense. The combination of dark chocolate chips elevates every bite, adding a bit of indulgence while keeping the overall profile healthy. Furthermore, the simplicity of the recipe means you can have a nutritious snack ready to enjoy without spending hours in the kitchen. It’s a win-win for those busy days when nutrition matters most!
Kitchen Tools You’ll Need
- Large bowl – for mixing the ingredients together.
- Whisk – to thoroughly combine the liquid ingredients.
- Spatula – for folding in the dry ingredients smoothly.
- Small cookie scoop – helps to portion out uniform balls.
- Microwave-safe bowl – essential for melting chocolate and coconut oil.
- Baking sheet – to freeze the protein balls on a lined surface.
- Use full-fat Greek yogurt for richer flavor and creamier texture.
- Let the chocolate dip cool slightly if it thickens too much while melting.
- Experiment with different protein powders; some may be sweeter than others.
- To achieve a smoother rolling texture, warm your hands slightly to prevent sticking.
- Freeze them individually to avoid clumping, making it easy to grab one when desired.
- Mistake: Chocolate mixture is too thick.
- Why it happens: The chocolate may not be melted enough or needs more coconut oil.
- How to fix it: Gently reheat with more coconut oil until smooth.
- Mistake: Balls don’t hold shape.
- Why it happens: Not enough binding ingredients or too much moisture.
- How to fix it: Add a bit more almond or oat flour until the consistency is firmer.
- Mistake: Flavors are bland.
- Why it happens: Insufficient seasoning or flavor enhancements.
- How to fix it: Adjust salt or add more vanilla for depth.
- Replace dark chocolate chips with white chocolate or dried fruit.
- Incorporate spices like cinnamon or cocoa powder for added flavor.
- Swap coconut oil with almond butter for a nutty flavor.
- Add shredded coconut for a tropical twist.
- Mix in nuts for a crunchy texture contrast.
Ingredients
Greek yogurt: Provides creaminess and boosts protein content for satiety.
maple syrup: Adds a natural sweetness and a hint of flavor.
vanilla extract: Enhances the overall taste with a warm, aromatic profile.
salt: Balances sweetness and boosts flavor complexity.
vanilla whey protein powder: Important source of protein that also adds a touch of flavor.
almond flour: Contributes a nutty flavor and unique texture.
oat flour: Adds heartiness and binds the ingredients together.
dark chocolate chips: Introduces a touch of indulgence with rich chocolate flavor.
coconut oil: Helps to melt the chocolate smoothly and provides healthy fats.
Ready to cook? Scroll to the recipe card below for exact measurements.
How to Make Greek Yogurt Protein Balls
Follow these simple steps to create your delicious protein balls.
STEP 1. Prepare the baking sheet. Line a large baking sheet with parchment paper and set aside.
STEP 2. Combine wet ingredients. In a large bowl, add Greek yogurt, maple syrup, vanilla and salt. Whisk well.
STEP 3. Add protein powder. Add protein powder and whisk until smooth.
STEP 4. Mix in flours. Add almond flour and oat flour and stir with spatula until well mixed.
STEP 5. Scoop the mixture. Using a small cookie scoop, place balls of mixture on the prepared baking sheet. I had 17.
STEP 6. Freeze to set. Freeze for 30 minutes to set.
STEP 7. Melt chocolate. Meanwhile, in a small bowl, combine chocolate chips and coconut oil. Microwave in 1 minute increments until runny, stirring in between.
STEP 8. Form balls and dip. Remove balls from the freezer, roll into round balls and dip in chocolate, shaking off the excess. Place back on parchment.
STEP 9. Adjust chocolate consistency. If chocolate is too thick, add more coconut oil, melt and mix.
STEP 10. Final freeze. Freeze for another hour, then transfer to an airtight container and keep in the freezer.
STEP 11. Serve. To enjoy, thaw one for 5 minutes and dig in.
Why This Recipe Works
The texture of these protein balls is excellently balanced; the creamy Greek yogurt combined with the nutty almond and oat flours creates a hearty yet tender bite. The incorporation of dark chocolate chips introduces a rich and flavorful layer that beautifully contrasts with the lighter ingredients. This recipe not only provides a satisfying snack but does so without compromising on health. The method of freezing after mixing allows the flavors to meld and the balls to set properly, making them easier to handle. All together, you have an appealing treat that provides both comfort and nourishment.
Pro Tips
To ensure your Greek Yogurt Protein Balls turn out perfectly, consider these expert tips:
Common Mistakes to Avoid
Variations
Nutrition Highlights
| Nutrient | Role |
|---|---|
| Protein | Helps support satiety and balanced meals. |
Serving Ideas
Pair these protein balls with a fresh fruit smoothie for a satisfying breakfast or afternoon snack. They also make great additions to lunch boxes for a healthy treat during school or work. Consider serving them alongside a cup of coffee or tea for an uplifting mid-morning pick-me-up. They are versatile enough to be enjoyed after workouts or as a part of your favorite dessert platter!
Best Occasions for This Recipe
These protein-packed delights are perfect for various occasions. They shine at family gatherings, offering a healthier sweet option for kids. They can also be a delightful post-workout snack or a quick fix for a busy day as you rush out the door. Whether for meal prep or sharing at a potluck, these bites fit seamlessly into any health-conscious planning!
Meal Prep & Storage
Meal Prep
Make a double batch of these protein balls for easy snacks throughout the week. They work well in meal prep containers for grab-and-go options. You can prepare them and keep them in the freezer until needed.
Refrigeration
If stored in an airtight container, these protein balls can last for up to a week in the refrigerator. Just remember to check for freshness before enjoying.
Freezing
For longer storage, keep the balls in a freezer-safe container. They can last for up to three months in the freezer. Ensure they are well-wrapped to prevent freezer burn.
Reheating
To enjoy, simply remove one from the freezer and let it thaw at room temperature for about five minutes. There’s no need to heat them, as they taste great served cold!
{image_template}
FAQs
Can I use non-dairy yogurt?
Yes, you can swap Greek yogurt for a plant-based alternative, but ensure it has similar consistency.
How do I know if they are done freezing?
They should feel firm to the touch and hold their shape when rolled.
Can I make these nut-free?
Absolutely! Substitute almond flour with sunflower seed flour or an equal amount of oats.
Are these suitable for kids?
Definitely! They provide a nutritious snack option without artificial ingredients.
How long do they last in the freezer?
They will stay good for up to three months when stored properly in an airtight container.
Save This Recipe for Later
Don’t forget to pin this recipe to your favorite boards for easy access later! These healthy, delicious snacks are perfect for any occasion.
Conclusion
Greek Yogurt Protein Balls are more than just a tasty treat; they’re a practical solution for those aiming to eat healthier without sacrificing flavor. With just a few simple ingredients and steps, you can create snacks that support your health goals. Whether you’re preparing for a busy week, seeking a nutritious after-school snack, or wanting a guilt-free indulgence, these balls fit the bill. Give this recipe a try, and enjoy the delightful fusion of taste and nutrition!